Hi everyone, and happy Thursday. This week I got the chance to do Something *Really* New, by having a guest blogger. My sister and awesome photographer offers a wealth of knowledge to you all, about her process of refurbishing two beautiful cushioned chairs. If you've ever toyed with the idea, she offers tips from her experience. (For those of you who just want some fashion, you'll see a shot or two of my favorite Fit & Flair dress.) Without further ado, I will turn this blog over to her.
In my search to make our little home more comfortable one thing I really needed to address was seating. My sister and I share a lovely and cozy 1 bedroom apartment. Our place is so small that we cannot even have a sofa that is bigger than a love seat. With that said we still have a larger family and family is huge in my life. Seating and storage has always been a challenge in our space so we are actually in the process of rearranging, reorganizing, and redefining the space.
I wanted to add cushioned seats to our 'living room' area since comfort is key. I searched for about two weeks on Craigslist before I was at my wits end. Some project chairs were over-priced while others were going to be more time/money investments than I was will to do/spend with my time frame. Then one hot day a few weeks go I came home to my lunch break and saw two chairs in rough condition on the lawn with other things ready to be dumped.
Being a curious person that I am I decided to go and check them out, the fabric that was once white velvet was now a dirty cream with some obvious stains and one chair's fabric was torn completely, exposing the cushion. But the structure of both chairs was still great. I tested to make sure that the legs were not warped or loose. It looked great, I also did the 'smell test'. Did the previous owner have a pet that was cozy or rude to this little beauty? Sniff sniff sniff… great no pee smell or foul odor, no signs of smoking either. Of course as I was smelling the seat the son of the homeowner came out to talk to me. Lol I swear if cameras followed me around sometimes I could make my own TV show…. The man was very happy that I would take and use the chair. No landfill for those bad boys!
I had the chairs for about a week and a half before I started my search for the fabric. Looking at them, thinking about WHERE I would put them in my tiny place. I'm a HUGE Pinterester and looked up some DIY re-upholstery before and afters. Apartment Therapy is my GO TO inspiration source for all things Before/After and for smart small-space solutions.
I searched for a long time via internet and in store for a fabric I could get on board with. Large floral prints though were not easy to come by. I finally found the fabric in Hancock Fabrics ON SALE!!!! Originally it was $37/ yard. I was prepared to make that purchase since I knew the price that chairs could go for if purchased new. But THANK YOU 4th of July Fabric Sale. I paid just $7/ yard!!! I showed the photo of my chairs to the sales woman and asked her how much fabric would need to get to cover the cushion. She recommended 1/2 yard per chair but since I was worried to have too little I decided to get 1 1/2 yards for the two chairs. She was right! :) So now I have little scraps to work with for something else if I want.
The chairs have a standard construction and the cushion area actually is attached with 4 screws until the frame of the chair, one screw per corner. I just unscrewed the cushion from the frame to start the project.
Directions for standard chairs:
Unscrew the cushion from the base and inspect the fabric construction
With pliers remove all the staples-this is the longest part of your process by far (Put some good music on and go to town).
After the nails are removed brush your baseboard and work area to protect the beauty of your fabric. 

Place the fabric pattern-side down onto the work area. Then place the cushion and baseboard down on top of it as well (cushion side touching the "wrong" side of the fabric. 

TIP- GET A FRIEND TO HELP!
This part is not tricky but does go by easier with you have a friend to help. Tautly pull the fabric and using a staple-gun, staple the fabric to the back of the baseboard. Having a friend help you pull the fabric from the other side of the piece will insure that you are able to have the fabric smooth and without waves or puckers.
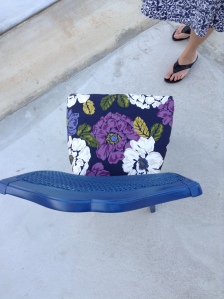
This is the finished cushion.
I made the mistake of doing the first cushion without help...hence the lack of photos from that section. It was rough and I would never do that again. Plus the wood shop I was working in was about 100 degrees and had no AC or airflow, I just wanted to hurry and be done. 

Now it's time to deal with the chair base- TIP: If you want to be the most time saving I would work on the base first and while the coats of paint dry work on the cushion.
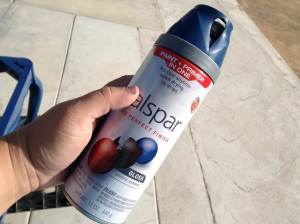
I choose Valspar because I liked the shade of blue that they offered which was not available with my normal Rust-Oleum. Since the fabric was matte, I wanted to have a gloss finish for contrast.
Choose a spray paint that has a primer and is fit for all materials/ can work indoor/outdoor to make sure all your bases are covered.
On my lunch break I got to work with my sister to get the frames painted. We propped the chairs on old crates to insure we could spray the feet of the chair well.
We used about 1 can per chair and coated it fully 2 times and then spot checked the woven portion since that was a tricky spot.
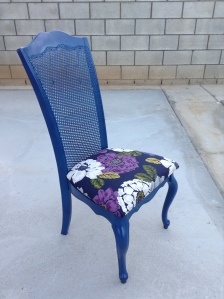
Reattach the cushion with the same screws you removed and viola! You have a new piece with personality and beauty.
We love the results!!
I encourage you to give new life to something already loved and used. As you see, you can have a beautiful and stylish piece from something that was a little outdated. Help reduce, reuse, recycle and lower input into the landfill. :) <3 font="" nbsp="">
Yvonne is working to publish more on her official blog soon, with more posts on DIY projects and other fun ideas. Check back here in the future for some links.
Thanks for stopping by, everyone! Happy Thursday!


